Writing this is kind of surreal. This guide, born out of thousands of hours of “the diamond thing,” as I affectionately called it for almost a year before deciding to actually pursue it professionally, started on Reddit. It’s been revised what feels like one hundred and one times over – tweaked with different analogies, specifics to a certain buyer and our ongoing conversation, with more information being added along the way. This is really the first time that I’m dismantling the entire guide, because hey… we need to be professional now, right?
Well. Kind of. I’m going to do my best.
This guide has helped a LOT of people. It’s brought me into people’s lives for engagements, anniversaries, births, a death or two, and countless self-celebrations. Diamonds, helping people source them, and understand them beyond what their jeweler explained or a basic 4 C’s guide online, have given me such incredible purpose in my life again. I cannot wait to see how this guide adapts and changes with our business over time, but for now, I present to you, the Adamas version of Gabrielle’s Ideal Diamond Proportions Guide (or… Cut is Everything, “Excellent” means NOTHING!)

Understanding Diamond Proportions: A Guide to Optimizing Light Performance #
I’m a sourcer, procurer, and examiner of diamonds—not a graduate gemologist. But if mastery requires 10,000 hours of experience, I’ve easily surpassed that 100 times over, reviewing thousands of stones every night. These guidelines aren’t just theoretical—they come from hands-on experience evaluating and sourcing diamonds in every cut, color, and clarity.
For our business, I oversee all things diamonds, including partnerships with dealers and, most importantly, working with custom cutters. The guidelines I set are extremely tight because if they’re cutting a stone specifically for us, I cannot return it—especially in bulk orders. These standards ensure the diamonds I source and approve are consistently high-performing.
That said, these guidelines are not gospel. Diamond cutting is an art as much as it is a science, and no two stones behave exactly the same, even with identical specs on paper. I’ve evaluated 8–10 round brilliants with the exact same proportions that still performed differently due to variations in the rough, the way inclusions are positioned, or subtle differences in color and clarity grading. This is why I always stress that these numbers are tools, not absolute rules.
How Diamond Proportions Work Together #
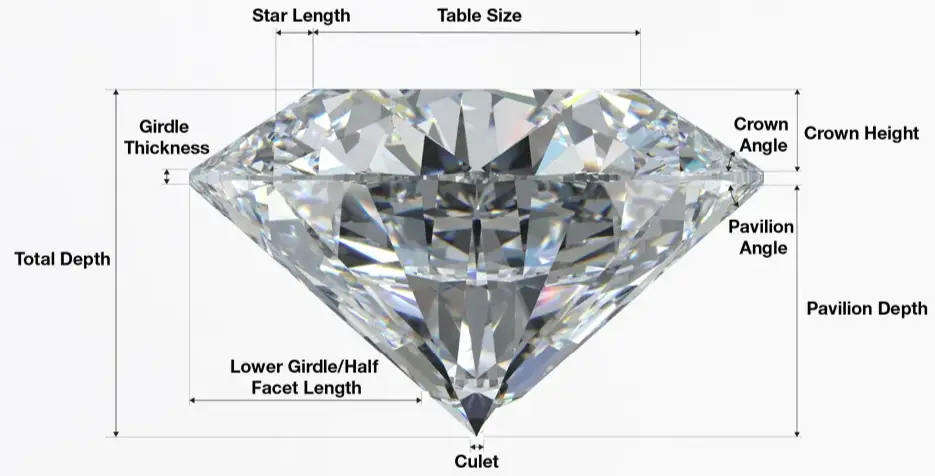
When we talk about diamond cut quality, we’re really talking about how the diamond interacts with light. This interaction is determined by a combination of table, depth, pavilion, and crown proportions—each working together like a system of levers. One adjustment impacts the others, and balance is key.
Here’s what each proportion represents and how it contributes to overall performance:
1. Table Percentage (Flat top facet of the diamond) #
-
The table is the largest facet of the diamond and acts as the primary entry point for light.
-
A table that’s too large means more light escapes instead of reflecting internally, reducing fire and contrast.
-
A table that’s too small restricts light entry, which can make a diamond appear darker.
-
Balance is key: A properly proportioned table allows light to enter and interact optimally with the pavilion and crown.
2. Depth Percentage (Height of the diamond from top to bottom) #
-
Depth plays a crucial role in determining how well light is reflected within the stone.
-
Too deep: Light leaks out the sides instead of reflecting back, making the diamond appear smaller and less brilliant.
-
Too shallow: Light exits out the bottom, reducing brightness and creating a glassy or washed-out look.
-
Ideal depth ensures that light bounces within the stone and exits through the top, enhancing brilliance.
3. Pavilion Depth & Pavilion Angle (Bottom portion of the diamond) #
-
The pavilion is where light is either captured and reflected back up or lost through leakage.
-
A steep pavilion angle creates a dark, dull effect because light isn’t efficiently bouncing back.
-
A shallow pavilion angle leads to light escaping through the bottom, making the diamond appear faded or “windowed.”
-
The pavilion works in tandem with the crown and table to dictate overall brightness and contrast.
4. Crown Angle & Crown Height (Upper portion between the table and girdle) #
-
The crown helps disperse light into its colorful spectrum, contributing to fire.
-
A steep crown angle can enhance fire, but if too extreme, it diminishes brilliance.
-
A shallow crown angle can increase brightness but reduce dispersion, leading to a less dynamic sparkle.
-
Crown height is also important—too low, and you lose dispersion; too high, and light doesn’t return properly.
5. Girdle Thickness (Outer edge where the crown and pavilion meet) #
-
The girdle impacts durability and weight distribution.
-
Too thin = risk of chipping.
-
Too thick = unnecessary weight retention, making the diamond face-up smaller than its carat weight suggests.
-
Ideal range: Provides durability without adding excess weight or reducing face-up appearance.
Why Proportions Matter More Than Grades #
Cut quality is the most critical factor in determining a diamond’s visual performance. Certification reports alone won’t tell you how well a diamond actually performs. Two diamonds graded as “Excellent” by GIA or “Ideal” by IGI can look completely different depending on their proportions.
This is why I always prioritize proportions-like-a-puzzle over a single metric. You can (and sometimes do!) have a stone that checks every “ideal” box but still lacks life because the proportions don’t work together. On the flip side, a diamond with a slightly out-of-range number might still perform beautifully if the other proportions compensate for it.
Putting It All Together: The Hierarchy of Importance #
When evaluating a diamond, I consider table and depth first, pavilion second, and crown third.
-
Table + Pavilion = Controls light return and brilliance
-
Depth + Crown = Determines fire and dispersion
-
Girdle + Additional Factors = Impacts durability and spread
A well-balanced diamond doesn’t necessarily have to hit every single number perfectly—it just needs to maintain proportion harmony.
For example, I’ve seen radiant cuts where the pavilion and crown angles were swapped compared to the usual ideal ranges, yet they still performed beautifully. That’s because the diamond’s proportions were balanced as a whole.
Final Thoughts: Numbers Are Tools, Not Rules #
If there’s one takeaway from this, it’s that diamonds don’t exist in a vacuum. A perfect set of proportions doesn’t guarantee a perfect stone, and a slightly off-number doesn’t mean it’s a bad diamond.
Every single diamond is different—even when the numbers match. That’s why I always recommend looking at real-life videos, multiple angles, and proportion balance rather than just chasing stats on a grading report.
This approach has helped me source and approve some of the most brilliant, high-performing diamonds on the market (at crazy low prices). I hope it helps you make a confident and informed decision.
If you have questions, ask! I’m always happy to help break this down further.


